> ## Documentation Index
> Fetch the complete documentation index at: https://docs.conversion.ai/llms.txt
> Use this file to discover all available pages before exploring further.
# Build your first workflow
> Build and test a welcome workflow, then choose nodes for follow-up messages, branches, and waits.
Build this short workflow: **a test contact meets your criteria → wait five minutes → send your welcome email → exit**. Start with one contact so you can check each step before expanding the audience.
## Before you begin
* Have a contact record for an inbox you control. The screenshots use a sample contact; substitute your own test contact's email address.
* Finish [your welcome email](/product-docs/user-guide/first-email). You can assemble the workflow while the email is a draft, but it must be published and free of issues before activation.
* Check the test contact's subscription status and [communication limits](/product-docs/workspace-settings/emails-and-domains/overview#communication-limits). Matching a workflow's entry criteria does not by itself make a contact eligible to receive email.
## Create the workflow and choose who enters
Open **Workflows**, click **New workflow**, and name it **User guide - Welcome workflow**. A new workflow starts **Paused**. You can build and review it before contacts enter.
Click **Contact meets criteria**, then **Add criteria**. In the Statement Builder, choose **Contact**, select **Email**, choose **equals**, and enter the email address of your test contact.
You can also describe the same rule with Ask AI, then inspect the generated field, operator, and value. See [Find contacts with the Statement Builder](/product-docs/user-guide/statements).
Confirm that the rule matches your intended contact. For this exercise, expect **1 match**. A zero count usually means the record is missing or the address differs; more than one means you should inspect the matching records before proceeding.
Close the criteria editor. Leave **Allow re-enrollment** off for this first welcome flow so contacts do not repeatedly enter it. Leave the optional **Exit condition** empty for this simple workflow.
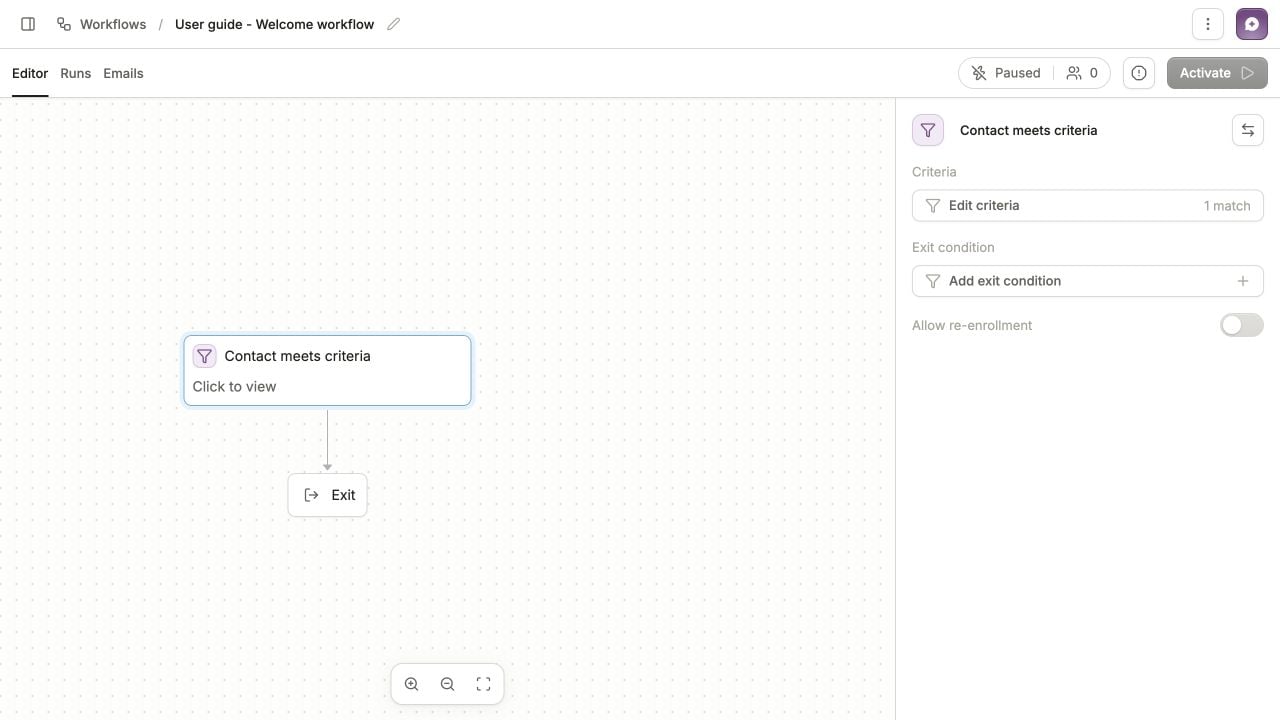 A criteria trigger reacts to contacts meeting a rule. A [form submission or other event trigger](/product-docs/workflows/triggers/event-based) reacts to something happening. For a real welcome workflow, choose the trigger that represents the moment someone should start, such as submitting your signup form.
## Add the delay and email
A **node** is a step in the workflow. The trigger controls who enters; the nodes control what happens next. This example uses **Time delay**, **Send email**, and **Exit**.
Click a blank area of the canvas to open the node palette on the right. Search for **Time delay**.
A criteria trigger reacts to contacts meeting a rule. A [form submission or other event trigger](/product-docs/workflows/triggers/event-based) reacts to something happening. For a real welcome workflow, choose the trigger that represents the moment someone should start, such as submitting your signup form.
## Add the delay and email
A **node** is a step in the workflow. The trigger controls who enters; the nodes control what happens next. This example uses **Time delay**, **Send email**, and **Exit**.
Click a blank area of the canvas to open the node palette on the right. Search for **Time delay**.
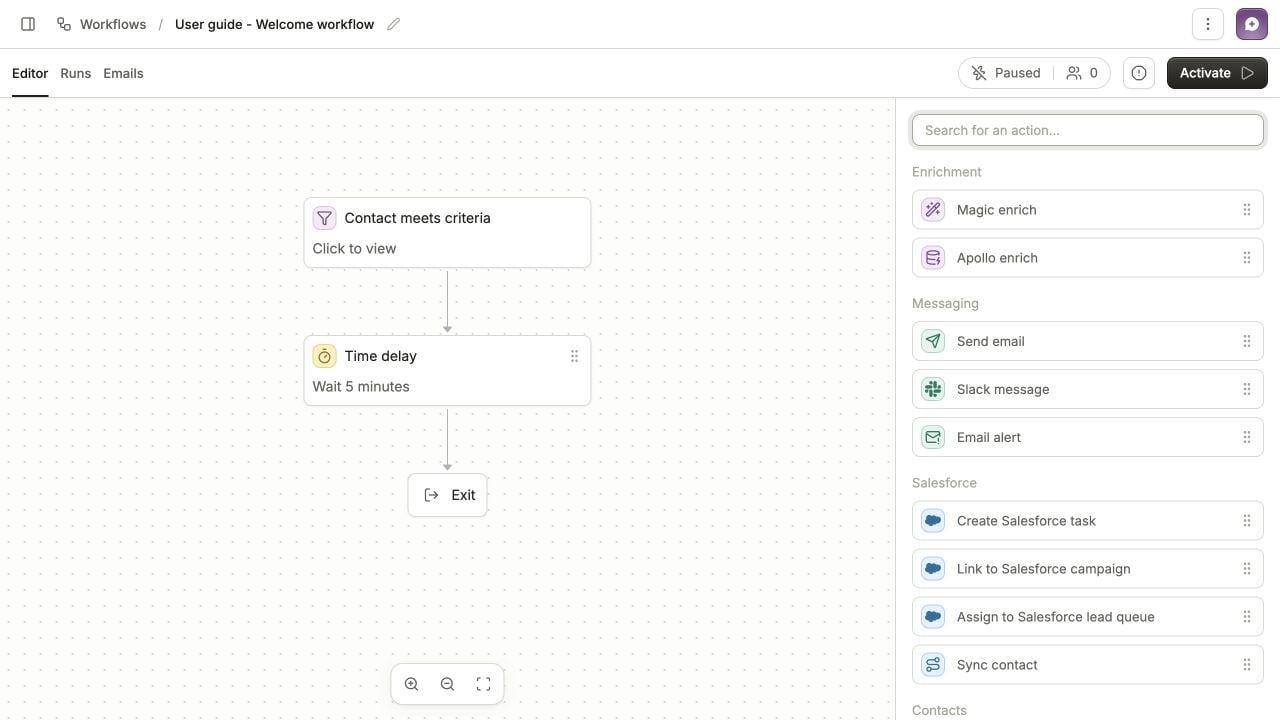 Drag **Time delay** onto the connection between the trigger and **Exit**. Click the new node and set **Wait for** to **5 Minutes**. The node should now read **Wait 5 minutes**.
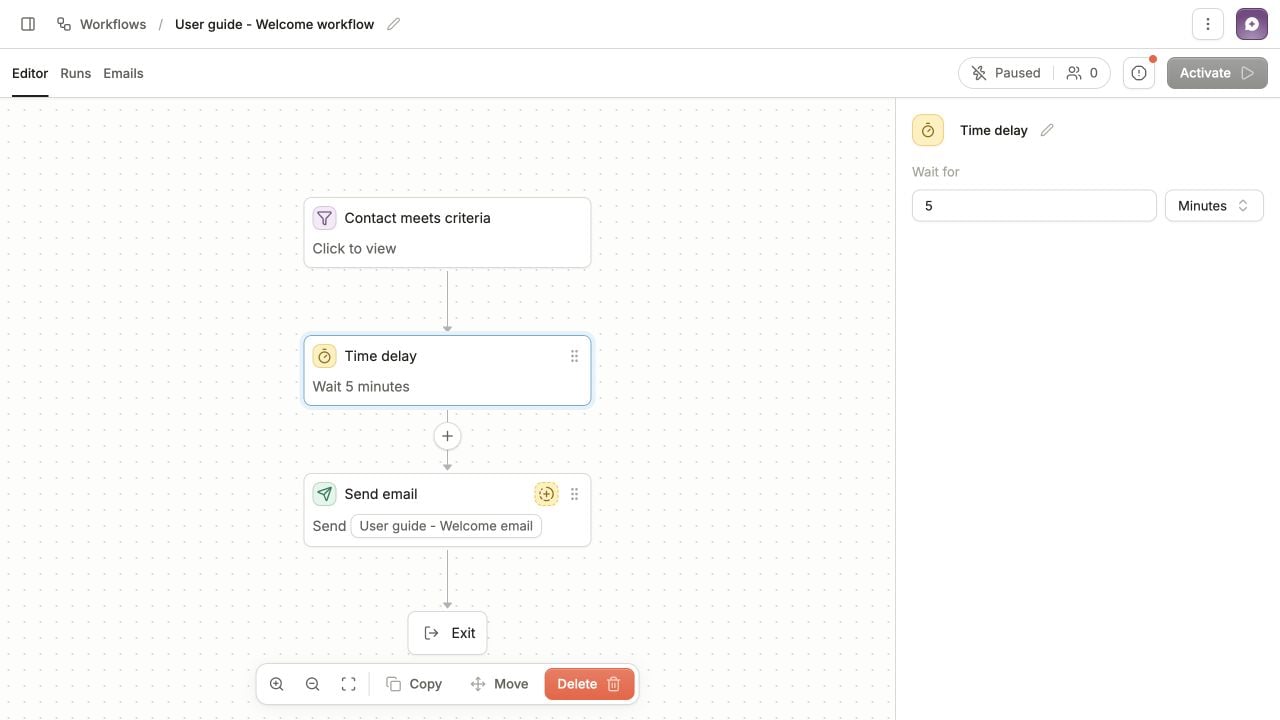 Click the blank canvas again. Drag **Send email** onto the connection between the delay and **Exit**. Click the email node, open **Select an email...**, and choose **User guide - Welcome email**.
Follow the connecting lines to verify the order: trigger, delay, email, then exit. If the email is still unpublished or incomplete, the node explains what must be fixed. Click **Manage** to open it, resolve its issues, preview and test it, then publish the reviewed email.
Click the blank canvas again. Drag **Send email** onto the connection between the delay and **Exit**. Click the email node, open **Select an email...**, and choose **User guide - Welcome email**.
Follow the connecting lines to verify the order: trigger, delay, email, then exit. If the email is still unpublished or incomplete, the node explains what must be fixed. Click **Manage** to open it, resolve its issues, preview and test it, then publish the reviewed email.
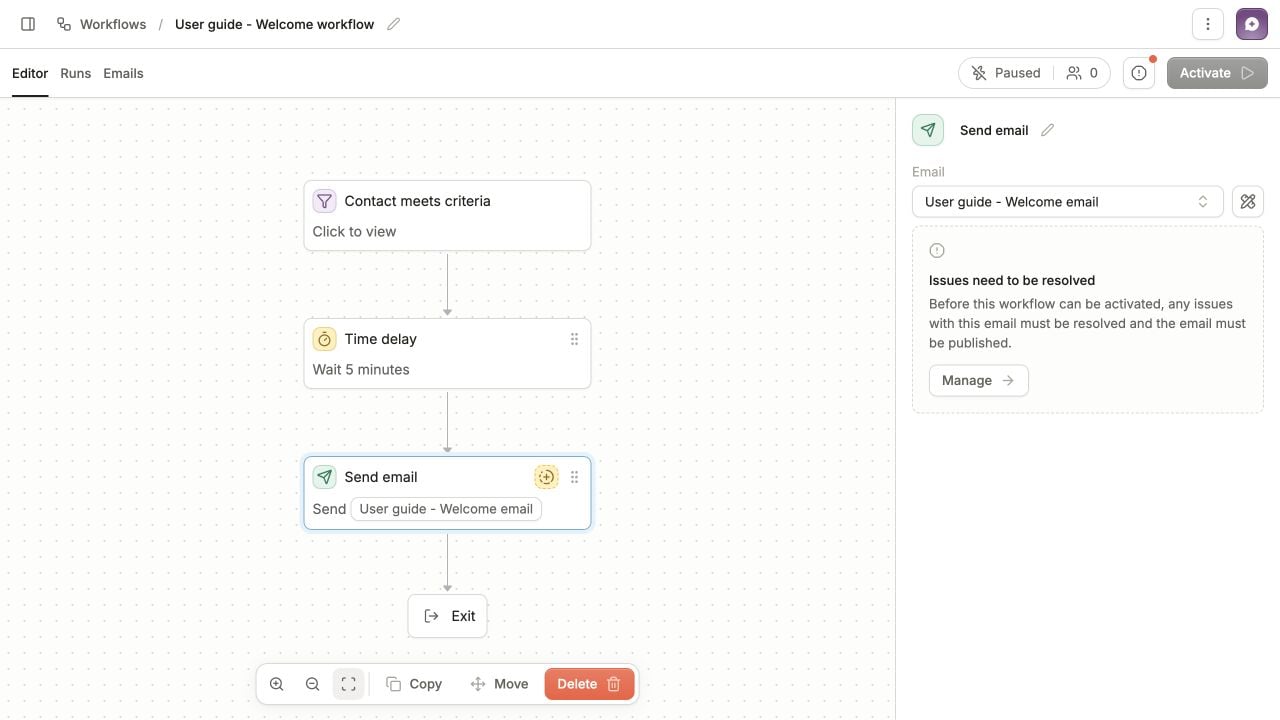 Test this sequence first. Then use [Choose nodes for a follow-up](#choose-nodes-for-a-follow-up) below to add messages, branches, or waits.
## Check before activating
Review these together:
* **Who enters:** the trigger still matches only your intended test contact.
* **What happens:** the delay uses minutes, the email is the correct one, and the last step is Exit.
* **What is ready:** the email is published, its sender is configured, and workflow issues are resolved.
* **What can send:** the test contact can receive this email under the workspace's subscription and communication rules.
You can stop here with a completed, paused practice workflow. The next steps run it and can send an email.
## Run it with your test contact
1. Click **Activate**.
2. Read the confirmation, including **Immediately run workflow for … matching contact(s)**. Select this option only when you want contacts who already match to enter now. For this exercise, confirm the count is one and the criteria identify your test contact.
3. Click **Confirm and activate** when you are ready for the workflow to run.
Without the immediate-run option, an already matching contact does not enter just because you activated the workflow. The workflow waits for qualifying changes. See [criteria-based triggers](/product-docs/workflows/triggers/criteria-based) for enrollment and re-enrollment behavior.
## Check the result
Open **Runs**, select your test contact, and follow the highlighted path. The contact should wait at **Time delay**, reach **Send email**, then finish at **Exit**. Open a node to inspect its execution details. Check the **Emails** tab and your inbox for the email outcome.
If the contact does not enter, check the trigger, activation choice, and re-enrollment setting. If they enter but do not receive an email, check the node result and recipient details rather than assuming the trigger failed. The [Runs reference](/product-docs/workflows/runs) explains statuses and timing.
When the test is complete, pause the workflow before changing its entry criteria for a wider audience. Recheck the matching contacts and activation options before using it again.
## Choose nodes for a follow-up
With the workflow paused, choose the next step based on what should happen after the welcome email:
| You want to... | Add |
| - | - |
| Send a second message to the contact | [Send Email](/product-docs/workflows/nodes/send-email) |
| Leave two days between the welcome email and the next message | [Time Delay](/product-docs/workflows/nodes/time-delay) before that message |
| Follow up differently depending on whether the contact clicked | [If/Else Branch](/product-docs/workflows/nodes/if-else-branch) |
| Continue as soon as the contact clicks, with a different path if they never do | [Wait Until Condition Met](/product-docs/workflows/nodes/wait-until-condition-met) with a timeout |
| Send the next message during a particular weekday and time window | [Wait For](/product-docs/workflows/nodes/wait-for) |
| Stop this contact's run on a particular path | [Exit](/product-docs/workflows/nodes/exit) |
Add and configure each node from the palette as you did above. For enrichment, record updates, Salesforce actions, or integrations, choose from the [full node catalog](/product-docs/workflows/overview#node-categories) and follow that node's configuration page.
### Choose between a branch and a wait
Suppose you want a different follow-up for people who clicked the welcome email.
* **Time Delay, then If/Else Branch:** wait two days, then check whether the contact clicked. Every contact reaches a decision after the delay.
* **Wait Until Condition Met:** move on as soon as the click condition is met. Add a [timeout](/product-docs/workflows/nodes/wait-until-condition-met#timeout) if contacts who never click should receive a different follow-up.
Use the [Statement Builder](/product-docs/user-guide/statements) to select the specific email and activity. Leaving the email selection empty can match activity on other emails.
### Check each branch
An [If/Else Branch](/product-docs/workflows/nodes/if-else-branch#behavior) sends a contact down the **first matching path**. If you put a broad condition before a narrow one, the broad condition may catch people you intended for the narrow path.
For example, place “Enterprise customers in the United States” before “All enterprise customers.” Then choose a useful **All others** path, such as exiting or receiving a general message.
Before activating a branched workflow, check a contact who should match each path and one who should reach **All others**. Repeat the [activation checks](#check-before-activating) and inspect each contact's run before expanding the audience.
Test this sequence first. Then use [Choose nodes for a follow-up](#choose-nodes-for-a-follow-up) below to add messages, branches, or waits.
## Check before activating
Review these together:
* **Who enters:** the trigger still matches only your intended test contact.
* **What happens:** the delay uses minutes, the email is the correct one, and the last step is Exit.
* **What is ready:** the email is published, its sender is configured, and workflow issues are resolved.
* **What can send:** the test contact can receive this email under the workspace's subscription and communication rules.
You can stop here with a completed, paused practice workflow. The next steps run it and can send an email.
## Run it with your test contact
1. Click **Activate**.
2. Read the confirmation, including **Immediately run workflow for … matching contact(s)**. Select this option only when you want contacts who already match to enter now. For this exercise, confirm the count is one and the criteria identify your test contact.
3. Click **Confirm and activate** when you are ready for the workflow to run.
Without the immediate-run option, an already matching contact does not enter just because you activated the workflow. The workflow waits for qualifying changes. See [criteria-based triggers](/product-docs/workflows/triggers/criteria-based) for enrollment and re-enrollment behavior.
## Check the result
Open **Runs**, select your test contact, and follow the highlighted path. The contact should wait at **Time delay**, reach **Send email**, then finish at **Exit**. Open a node to inspect its execution details. Check the **Emails** tab and your inbox for the email outcome.
If the contact does not enter, check the trigger, activation choice, and re-enrollment setting. If they enter but do not receive an email, check the node result and recipient details rather than assuming the trigger failed. The [Runs reference](/product-docs/workflows/runs) explains statuses and timing.
When the test is complete, pause the workflow before changing its entry criteria for a wider audience. Recheck the matching contacts and activation options before using it again.
## Choose nodes for a follow-up
With the workflow paused, choose the next step based on what should happen after the welcome email:
| You want to... | Add |
| - | - |
| Send a second message to the contact | [Send Email](/product-docs/workflows/nodes/send-email) |
| Leave two days between the welcome email and the next message | [Time Delay](/product-docs/workflows/nodes/time-delay) before that message |
| Follow up differently depending on whether the contact clicked | [If/Else Branch](/product-docs/workflows/nodes/if-else-branch) |
| Continue as soon as the contact clicks, with a different path if they never do | [Wait Until Condition Met](/product-docs/workflows/nodes/wait-until-condition-met) with a timeout |
| Send the next message during a particular weekday and time window | [Wait For](/product-docs/workflows/nodes/wait-for) |
| Stop this contact's run on a particular path | [Exit](/product-docs/workflows/nodes/exit) |
Add and configure each node from the palette as you did above. For enrichment, record updates, Salesforce actions, or integrations, choose from the [full node catalog](/product-docs/workflows/overview#node-categories) and follow that node's configuration page.
### Choose between a branch and a wait
Suppose you want a different follow-up for people who clicked the welcome email.
* **Time Delay, then If/Else Branch:** wait two days, then check whether the contact clicked. Every contact reaches a decision after the delay.
* **Wait Until Condition Met:** move on as soon as the click condition is met. Add a [timeout](/product-docs/workflows/nodes/wait-until-condition-met#timeout) if contacts who never click should receive a different follow-up.
Use the [Statement Builder](/product-docs/user-guide/statements) to select the specific email and activity. Leaving the email selection empty can match activity on other emails.
### Check each branch
An [If/Else Branch](/product-docs/workflows/nodes/if-else-branch#behavior) sends a contact down the **first matching path**. If you put a broad condition before a narrow one, the broad condition may catch people you intended for the narrow path.
For example, place “Enterprise customers in the United States” before “All enterprise customers.” Then choose a useful **All others** path, such as exiting or receiving a general message.
Before activating a branched workflow, check a contact who should match each path and one who should reach **All others**. Repeat the [activation checks](#check-before-activating) and inspect each contact's run before expanding the audience.